Syncing Google Sheets Data to Excel
Google Sheets is a popular collaborative spreadsheet platform that has become a legitimate threat to Microsoft Excel’s market share over the past few years. Part of the reason why the platform has made such an unprecedented rise in a short period of time is because of its cloud-first product approach and functionality that nearly mimics Microsoft Excel. Formula names are identical, visualizations and pivot tables are possible, and programming for the platform in JavaScript makes it a breeze for
Excerpt
Google Sheets is a popular collaborative spreadsheet platform that has become a legitimate threat to Microsoft Excel’s market share over the past few years. Part of the reason why the platform has made such an unprecedented rise in a short period of time is because of its cloud-first product approach and functionality that nearly mimics Microsoft Excel. Formula names are identical, visualizations and pivot tables are possible, and programming for the platform in JavaScript makes it a breeze for developers (Note: New versions of Excel support programming in JavaScript). These product features, in addition to the fact that it is free for everyone to use has been enough of a reason to drive many companies to switch from Excel to Google Sheets for day to day spreadsheet work.
However, this type of switch has not always been met with overwhelming support. Among the parties who oppose Google Sheets are Excel power users who are vocal in their opinion that the platform is light years away from replacing Excel. I find myself among the group of Excel users who do not find Google Sheets to be a replacement for spreadsheet work and have been reluctant to work with any data in the platform. As a result, I have spent many months facing the major challenge of trying to figure out ways to sync Google Sheets data with Excel spreadsheets in order to work efficiently.
This arduous journey thankfully came to an end recently and the steps to the solution are provided below. I hope you enjoy this guide and if you have found it useful, then please share it with others!
Programs Needed: Google Sheets, Microsoft Excel and a text file
Note: The version of Excel I used for this post is Excel 2011 for Mac
Syncing Google Sheets Data with Excel
Step 1: Open a Google Sheet with the data that you would like to be queried and synced with an Excel spreadsheet.

Step 2: Click on File > “Publish to web”. A window will open and you will have the option to choose if the whole document can be publically accessed with the link provided or just a specific page/tab within the document. You also have the choice to output the data in various file formats (Web page, .csv, .tsv, .pdf, .xslx, .ods). After you decide on your output format, click “Publish”.
Important: Make sure that the “Automatically republish when changes are made” box is checked to ensure that updates to the document sync with the data that can be accessed by the provided link.


Step 3: Once published, grab the link provided, open up a text editor and post the link on the first line, followed by two new lines that should be blank. The two blank lines are necessary for Excel to correctly make a request to the URL. I am not exactly sure why those additional lines are needed, but I have run into errors by only including a line for the URL in the text file.


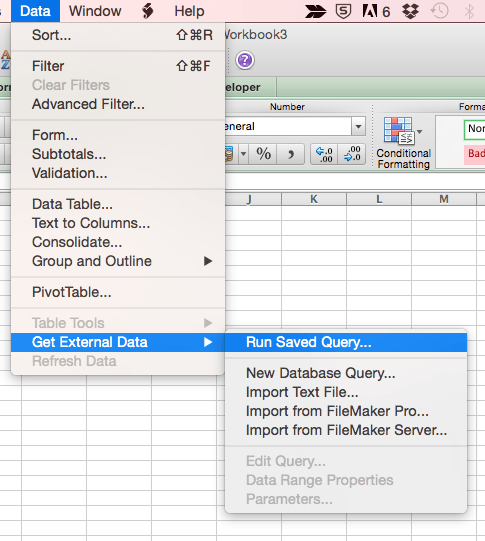
Step 4: In Excel, click “Data” > “Get External Data” > “Run Saved Query..”. You will be shown an explorer window where you can navigate through your directories to find the .txt file containing the Google Sheets link. Select your file when it is located and make sure that the “Enable:” field of the explorer window is set to “Text Files”. When you are all set, click “Get Data”.

Step 5: After you click “Get Data”, another explorer window will open that will give you the option to choose where the data from the query should be placed. You ideally want to place your queried data in its own tab, away from any editing that may dirty the data.

Step 6: You will see a brief message in the cell you selected from the explorer that confirms that a query is being created. Once that message disappears your sheet will be filled with the data from the Google Sheet. To update the excel sheet with any changes that are made to the Google Sheet, click on the “Data” tab and then click “Refresh”. This will make a query request to the URL and will update the values.

