How to Set Up Google Analytics
One of the most important parts of running a business is gathering customer data CORRECTLY. A large part of my job deals with running analytics audits (primarily Google Analytics) on brand websites to make sure that they are tracking the right data. At the basic implementation level, the majority of the issues that I run into revolve around sub-domain and multiple top-level domain tracking, but surprisingly, I still run into a hand full of brands that have simple tracking code issues involving d
Excerpt
One of the most important parts of running a business is gathering customer data CORRECTLY. A large part of my job deals with running analytics audits (primarily Google Analytics) on brand websites to make sure that they are tracking the right data. At the basic implementation level, the majority of the issues that I run into revolve around sub-domain and multiple top-level domain tracking, but surprisingly, I still run into a hand full of brands that have simple tracking code issues involving deprecated or incorrectly placed analytics tags. It is a little surprising to me that these issues would occur with the amount of documentation that Google provides, but then again, nowadays it is extremely easy to build a website without any coding experience. This lack of coding experience has a major effect on a person's Google Analytics tracking setup because unlike applications that build websites for you, Google still requires you to get your hands dirty and implement the code yourself.
The purpose of this blog post is to help those people who have little or no experience with both, programming and Google Analytics. Located below is my five-step guide to making Google Analytics more manageable.
(Note: This guide does not cover sub-domain or multiple top-level domain tracking. I will cover the tracking implementation for both of those situations in a future blog post.)
Step 1:
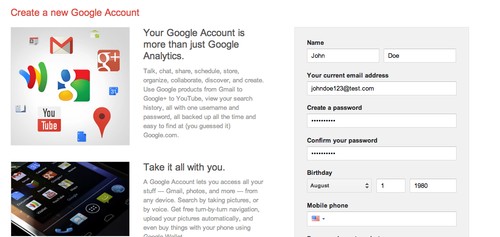
Sign up for a Google Account.
(Note: You do not need a Gmail account in order to register)
Step 2:
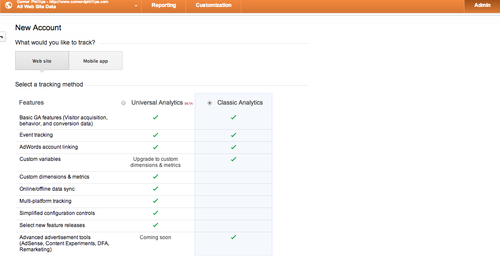
After you have signed up for your Google Account, login and create your first Google Analytics account. After being directed to the the "New Account" page, you will be asked select the type of tracking that you will be implementing. The two options provided are website or mobile app. Make your decision based on what you plan on tracking. (Note: A mobile website would not be considered a mobile app.) Below your device tracking setup, you will be asked to choose "Universal Analytics" or "Classic Analytics". Universal Analytics is still in Beta, so for now select Classic Analytics.
After selecting Classic Ananlytics, move on to the "setting up your account" section. In this section, you will fill out forms for the account and website name (It can be any naming convention), your website URL, the industry relevant to your website and time zone from where you are reporting.
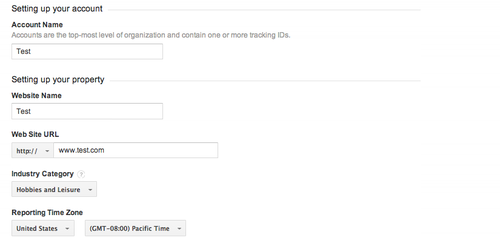
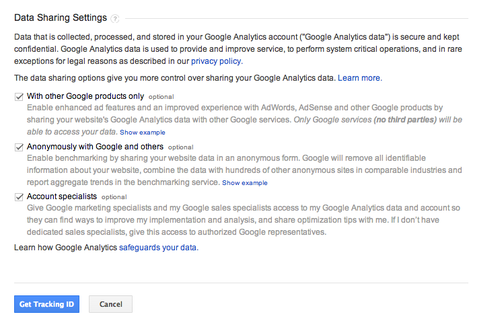
The final part to this step is to select if you would like your account information to be available to Google.
Step 3:
After you create a your account, you will be taken to the "Tracking Info" page in the "Admin" dashboard. This page is split into three separate elements: tracking ID/status, website tracking, and tracking code.
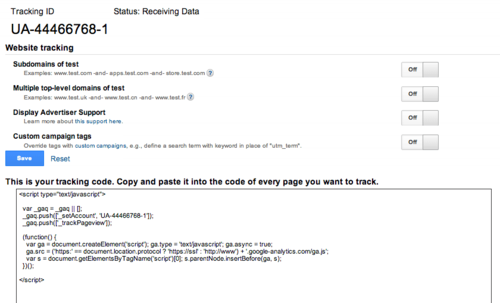
At the top of the page you will notice the tracking ID/status. The "tracking ID" is a unique identification code that contains your account ID and profile # (Note: profiles are now called views)

All that is important to know about the "tracking ID" is that it allows your tracking code to know which Google Analytics web property to send your website data to. Next to the "tracking ID" is the "tracking status." The "tracking status" is something that I will go into detail with in step five, but briefly, it is an indicator if data is being sent from your website to your account.
Directly below the tracking ID and status are the website tracking switches.
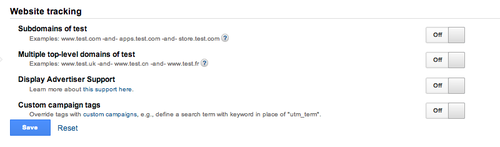
As I mentioned at the beginning of this blog post, this guide is for a standard Google Analytics implementation (e.x. http://www.test.com) and not for subdomain or multiple top-level domain tracking. So for the sake of this blog post, please disregard the switches, as they are only important to subdomains (e.x. http://m.test.com | http://blog.test.com), and multiple top-level domains (e.x. http://www.test.com & http://www.test.uk under one account). In a future blog post, I will provide a guide on implementing Google Analytics for sub-domain and multiple top-level domain tracking.
The last element on the page is the tracking code.
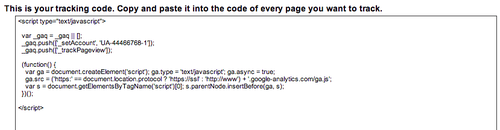
DO NOT MODIFY THIS CODE. It is already adjusted to your domain and account information, so all you need to do is copy the code snippet that is provided.
Step 4:
With the tracking code snippet copied, go to your website HTML files and paste the snippet on every page of your website right before the end of the <head> section in your code.
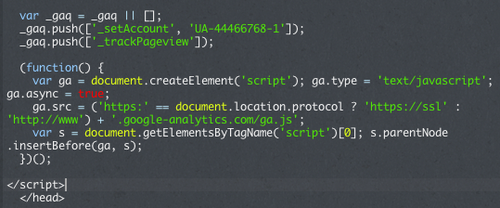
Why does the code snippet need to be placed there? The simple answer is for speed and reliability. Placing the Google Analytics code at the bottom of the <head> section allows you to not have to worry about the Google Analytics code slowing down your page load. (nerd alert)
Step 5:
Now that the tracking code has been implemented on ALL of your website’s pages, the last step is to check to make sure that the tracking code is registering data.
(Note: Typically your data will appear in your Google Analytics dashboard 24 hours after implementation, so don’t freak out if you don’t see any data right after you implement the tracking code.)
Two basic ways to see if your code is registering data:
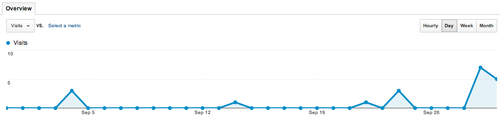
1. Go to your Google Analytics account’s reporting dashboard and check to see if data is appearing.
2. Go to your Tracking Info settings and see if your “Status:” label reads “Receiving Data”.
If neither of these tests are successful then something in your setup is still incorrect. Try going through each step in this blog post again and if that doesn't help, then go to the Google Analytics support page regarding tracking implementation.
(Link) Verify your web tracking support
(Side Note: There are also more involved ways to check to see if your Google Analytics implementation is correct such as installing the Google Tag Assistant plugin or the Google Analytics Debugger, Warning, these testing resources are more involved and might be a little overwhelming to a new user.)
And that is it!
A five-step guide that should help the basic user set up Google Analytics tracking on their website in the matter of minutes. Hopefully you will find this guide helpful and if you have any questions feel free to ask them in the comments section and I will try to answer them in a reasonable amount of time.